20 things to do after installing Kali Linux 1.x
I’ve compiled a small list of things that I always perform after installing a fresh copy of Kali Linux in this post. Because I got multiple laptops and workstations, I’ve tried to generalize the following instructions to suit everyone’s(including mine??) requirements. This is my top list of 20 things to do after installing Kali Linux. Your requirements might be completely different. If you have a suggestion, let me know via comments section. You can comment without registering.. so that’s an easy way to give me feedback and opinion.
WARNING: Following guide was written and tested for Kali Linux 1.x. I am working best to write a guide on Kali Linux 2.0 – Kali Sana. Use this guide at your own risk for Kali Linux 2.0 – Kali Sana.
Standard Packages:
Standard packages contain anything and everything I found useful. This list is divided into 3 parts:
- Kali Specific
Kali Linux is a special build from Debian. Kali Linux inherits a lot of the issues from Debian Linux. This section shows you how to resolve of those. They are not specific to Kali Linux only and you might leave them as it is, but I found that if I see an error my OCD kicks in and I have to make it go away…
- Useful utilities and Software’s
A collection of utilities and software’s I found useful. These are day to day software’s that are available in most other Linux distributions or at least I think they should be made available as part of a default installation.
- Enhancements and accessibility
Kali Linux is made to boot up fast and with low resources. But if you have some more CPU and GPU power to spare, you might want to try to make it look more colorful.
Kali Specific:
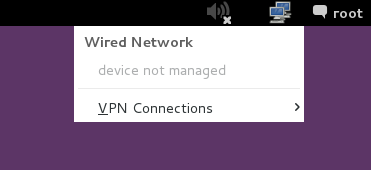
1. Fix Device not managed error – wired network
If you want NetworkManager to handle interfaces that are enabled in /etc/network/interfaces: Set managed=true in /etc/NetworkManager/NetworkManager.conf. So this file looks like this:
[main]
plugins=ifupdown,keyfile

[ifupdown]
managed=true
2. Fix default repository
The simplest way is to edit the /etc/apt/sources.list removes or comment every-line with # at the front and adds the following lines...
leafpad /etc/apt/sources.list
Comment or remove existing config with the following lines:
Kali Linux 2.0 – Kali Sana users – Use the following Repo list:
# Regular repositories
deb http://http.kali.org/kali sana main non-free contrib
deb http://security.kali.org/kali-security sana/updates main contrib non-free
# Source repositories
deb-src http://http.kali.org/kali sana main non-free contrib
deb-src http://security.kali.org/kali-security sana/updates main contrib non-free
Kali Linux 1.x users – you can keep using the repo below:
## Regular repositories
deb http://http.kali.org/kali kali main non-free contrib
deb http://security.kali.org/kali-security kali/updates main contrib non-free
## Source repositories
deb-src http://http.kali.org/kali kali main non-free contrib
deb-src http://security.kali.org/kali-security kali/updates main contrib non-free
Save and close the file.
3. Update, Upgrade, Dist-Upgrade
Clean, update, upgrade and dist-upgrade your Kali installation.
apt-get clean && apt-get update && apt-get upgrade -y && apt-get dist-upgrade -y
4. Fix PulseAudio warning
My Kali throws me this warning:
[warn] PulseAudio configured for per-user sessions ... (warning).Debian variants also throws similar warning during boot. To fix this do the following:
leafpad /etc/default/pulseaudio
Find this line:
PULSEAUDIO_SYSTEM_START=0
Replace 0 with 1
PULSEAUDIO_SYSTEM_START=1
Where, 0 = don’t start in system mode, 1 = start in system mode
reboot
I am having second thoughts about this step, refer to the whole article below to know WHY! If you have a suggestion about it, leave that on that article so that I can sort through them and pick the best one.
5. Enable sound on Boot
Follow the steps below to fix sound mute in Kali Linux on boot
apt-get install alsa-utils -y
In GNOME Desktop (The default Kali Desktop)
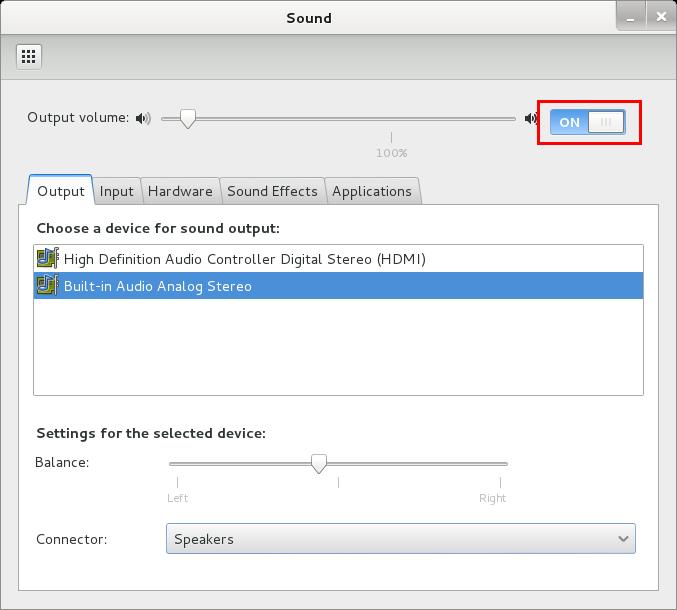
- Right Click on the small volume ICON and select Sound Preferences
- Alternatively, you can also go to Applications > System Tools > Preferences > System Settings > Sound to bring up the same options.
- Use the Output volume slider to ON, shown similar the screenshot above. That’s it you’re done. Close Sound window.


0 Comments